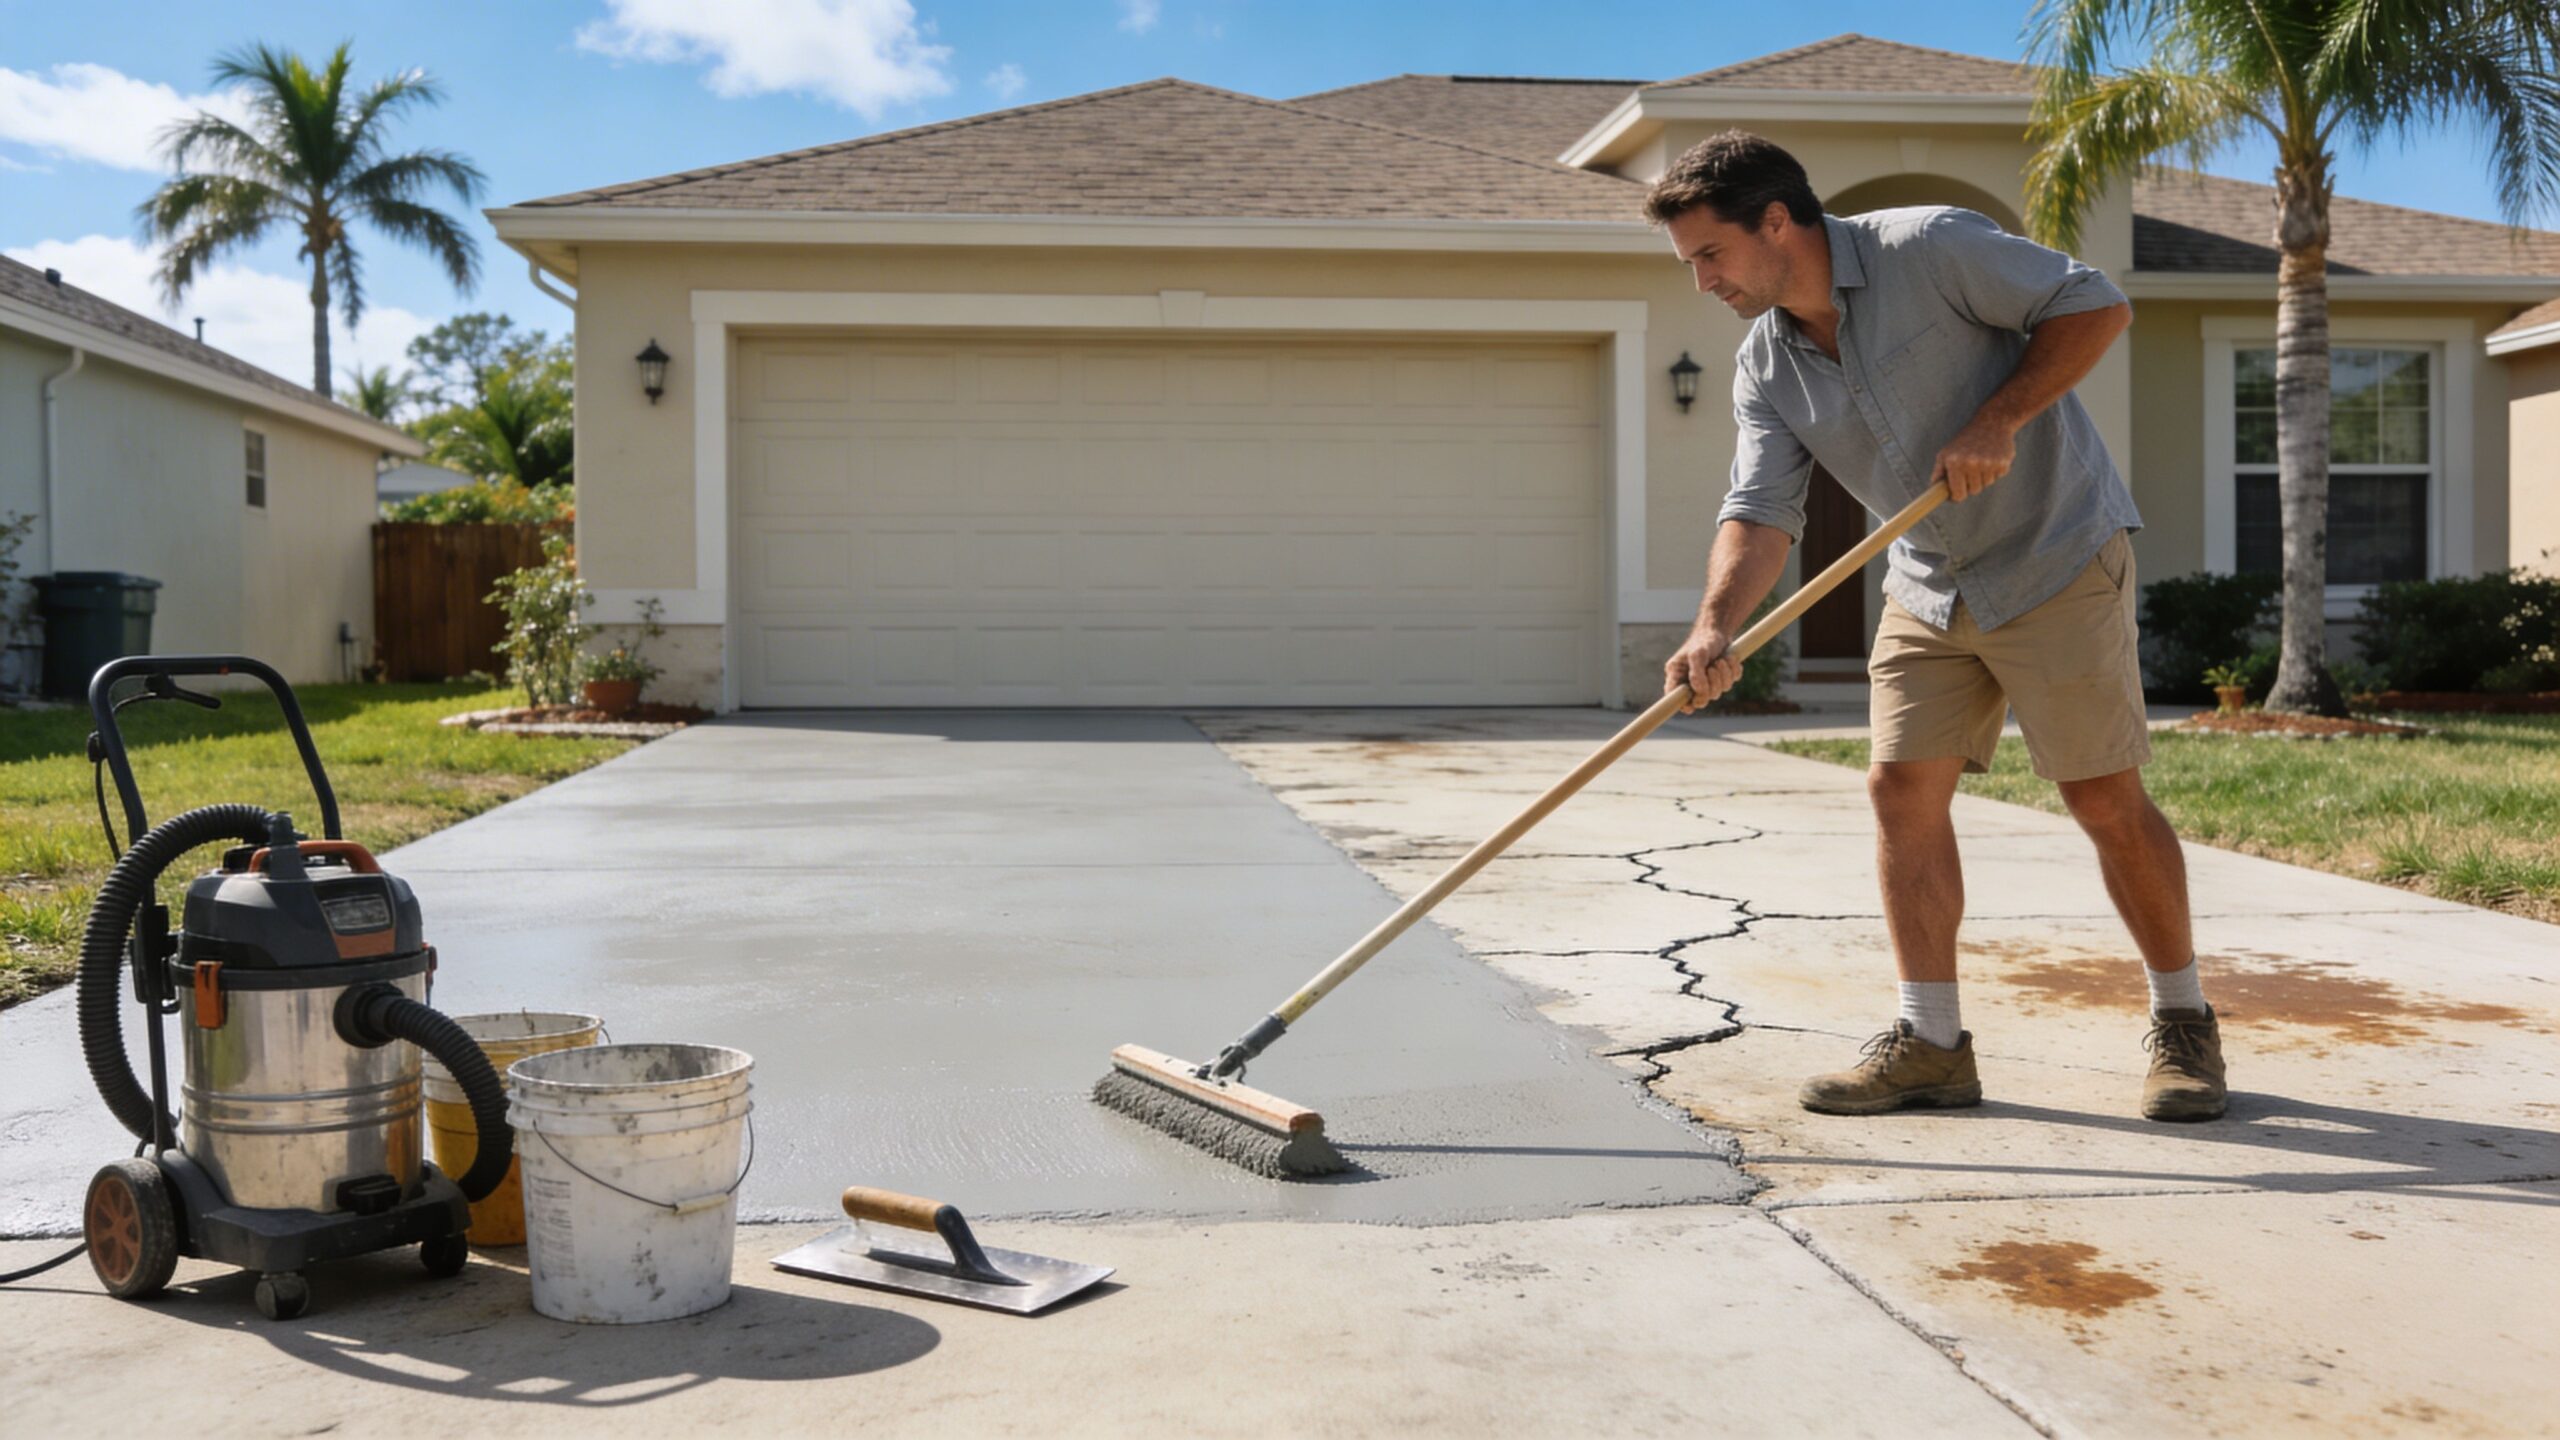
A lot of homeowners in Ocala, Dunnellon, Inverness, and Crystal River end up in the same spot. The driveway is still there, still usable, but it looks tired. Oil stains won’t come out. The color is blotchy. Small cracks have started to show. The surface feels rough underfoot, and every rainstorm seems to highlight another flaw.
That’s usually when people start asking how to resurface a concrete driveway instead of tearing it out. In many cases, that’s the right question. A properly installed resurfacing system can restore appearance, improve traction, and buy real service life without the disruption of demolition.
It’s also not a magic fix. Resurfacing works on the right slab and fails on the wrong one. In Central Florida, that distinction matters even more because humidity, heavy rain, and intense sun punish weak prep and cheap materials fast.
For structurally sound concrete, resurfacing can cost significantly less than full replacement, and a professionally installed polymer-modified overlay typically lasts 8 to 15 years according to Concrete Network’s guide to resurfacing durability. The rest of the job comes down to judgment, preparation, and timing.
Is Your Driveway a Candidate for Resurfacing
A worn driveway doesn’t automatically need demolition. If the slab is solid and the damage is mostly on the surface, resurfacing can be the smart middle ground between doing nothing and starting over.
In neighborhoods across Marion County and Citrus County, the most common candidates are driveways with cosmetic wear. That includes staining, discoloration, light flaking, and small stable cracks that haven’t turned into movement problems. Those jobs respond well to a quality overlay because the base concrete is still doing its job.
What resurfacing does well
Resurfacing is a thin cement-based overlay, often polymer-modified, that bonds to the existing slab. It can refresh the look of old concrete, create a more uniform finish, and improve traction with the right texture.
It’s especially appealing when the slab still has decent bones but poor curb appeal. For homeowners getting ready to sell, landlords trying to clean up a rental, or property managers maintaining entry drives, that matters.
A good resurfacing job can help with:
- Appearance problems: Faded color, patchy repairs, and stubborn stains
- Minor surface wear: Light spalling, shallow pitting, and weathered texture
- Safer footing: A broom or textured finish gives better grip in rainy weather
- Budget control: It avoids the mess and cost of tearing out a serviceable slab
What it does not fix
Resurfacing is not structural repair. It won’t stop a slab from sinking. It won’t correct active movement. It won’t solve drainage failures underneath the concrete.
That’s where many DIY projects go wrong. People see surface damage and assume a new top layer will hide everything. It may hide it briefly. It won’t solve what caused it.
Practical rule: If the driveway is moving, rocking, settling, or breaking apart in sections, don’t resurface it. Fix the underlying problem first or replace it.
Why this matters in Central Florida
Florida driveways deal with long wet periods, strong UV, and frequent moisture exposure. A slab that already has hidden weakness won’t improve just because it gets a fresh coating. In fact, the new surface often makes failure more obvious once water finds its way in.
For homeowners in The Villages, Homosassa, Belleview, or Lecanto, resurfacing makes sense when the slab is stable and the goal is renewal, not rescue. If the driveway is still structurally sound, resurfacing can be one of the most cost-effective ways to restore it. If it isn’t, replacement is the better investment.
Assess Your Driveway Damage Before You Begin
Before you rent a pressure washer or buy bags of resurfacer, walk the slab like an inspector. Don’t look at it from the street. Get on the driveway and study the details.
Concrete resurfacing only works on structurally sound slabs, and it cannot fix movement, sinking, or base deterioration. Trying to cover those problems usually leads to rapid failure of the overlay, as explained in Conker’s guidance on when it’s too late to resurface concrete.
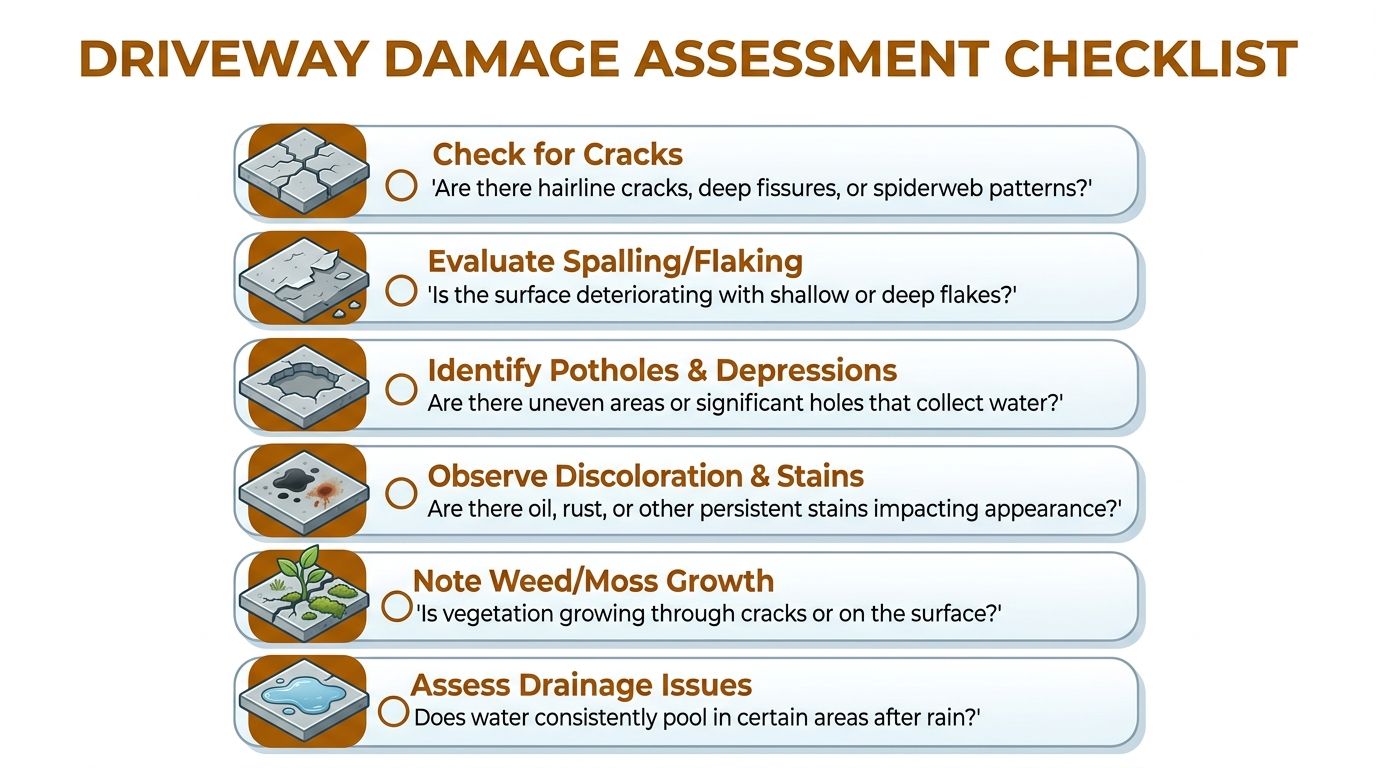
Damage that usually qualifies for resurfacing
Some defects look ugly but aren’t deal-breakers. These are the conditions that usually point toward resurfacing being viable:
- Hairline or minor stable cracks: The crack is visible but not widening, lifting, or dropping on one side
- Surface staining: Oil, rust, leaf tannins, and old tire marks that have become permanent
- Light flaking or wear: The top layer has weathered, but the slab underneath remains intact
- Discoloration: Sun-faded concrete, mismatched old patchwork, or an uneven finish
- Mild texture loss: The driveway looks slick or worn but still feels solid under load
If the slab is level, drains reasonably well, and doesn’t show signs of movement, these are the kinds of issues an overlay is meant to address.
Damage that points to replacement
Some driveway problems are telling you the slab has moved past resurfacing. These are the ones that matter most:
| Condition | What it suggests | Better path |
|---|---|---|
| Deep or widening cracks | Ongoing movement or slab failure | Professional evaluation |
| Sunken sections | Base erosion or settlement | Structural correction or replacement |
| Heaved edges or lifted panels | Movement below the slab | Replacement in many cases |
| Crumbling sections | Loss of slab integrity | Removal and replacement |
| Repeated water ponding in low spots | Drainage or settlement issue | Correct grade before surface work |
If you’ve got uneven panels, it helps to understand what’s causing that movement before deciding on an overlay. This guide on how to fix uneven concrete slabs is a useful next step if your driveway has settled or shifted.
A simple field check you can do yourself
Walk the driveway after a rain. Look for ponding that stays in the same spots. Then inspect the slab again on a dry day and look for pattern cracking, edge deterioration, and cracks with one side higher than the other.
Use this quick checklist:
- Look across the surface at a low angle: Sunlight reveals dips and raised areas better than standing above them
- Check expansion joints and crack lines: If they’re packed with weeds, separated, or breaking apart, movement may be active
- Watch the garage edge: Settlement near the apron often shows up there first
- Inspect corners: Corners tell the truth. If they’re breaking off, the slab may be losing support
- Notice drainage direction: Water should move off the slab, not sit on it
If the concrete sounds hollow in spots, rocks underfoot, or has alligator-style cracking, a resurfacer won’t save it.
The Florida-specific warning signs
In Central Florida, sandy soils and heavy downpours can wash support away below the slab over time. That means a driveway may look repairable at first glance but already have movement underneath. That’s why the decision has to start with slab integrity, not surface appearance.
If the concrete is stable, resurfacing is a practical upgrade. If it isn’t, covering it only delays a bigger repair.
The Critical Preparation Phase for a Lasting Finish
Most failed resurfacing jobs don’t fail because the bag mix was bad. They fail because the driveway wasn’t prepared well enough to accept the new material.
Surface preparation is essential for a resurfacing project’s success, and professionals typically use high-pressure pressure washers plus mechanical grinding to create the right profile. Inadequate cleaning is responsible for up to 90% of DIY failures, according to this field-focused resurfacing preparation guide.
Start with a real inspection and full cleanup
Preparation begins before washing. Clear the driveway completely. Move vehicles, planters, trash bins, edging stones, and anything else near the work area.
Then inspect the slab up close. Look for loose areas, weak edges, plant growth in joints, and old sealers that may interfere with bonding.
A proper prep routine usually includes:
- Remove loose debris and vegetation
- Expose the full slab edge where possible
- Mark cracks, low spots, and repair areas
- Protect adjoining walls, garage doors, and landscaping
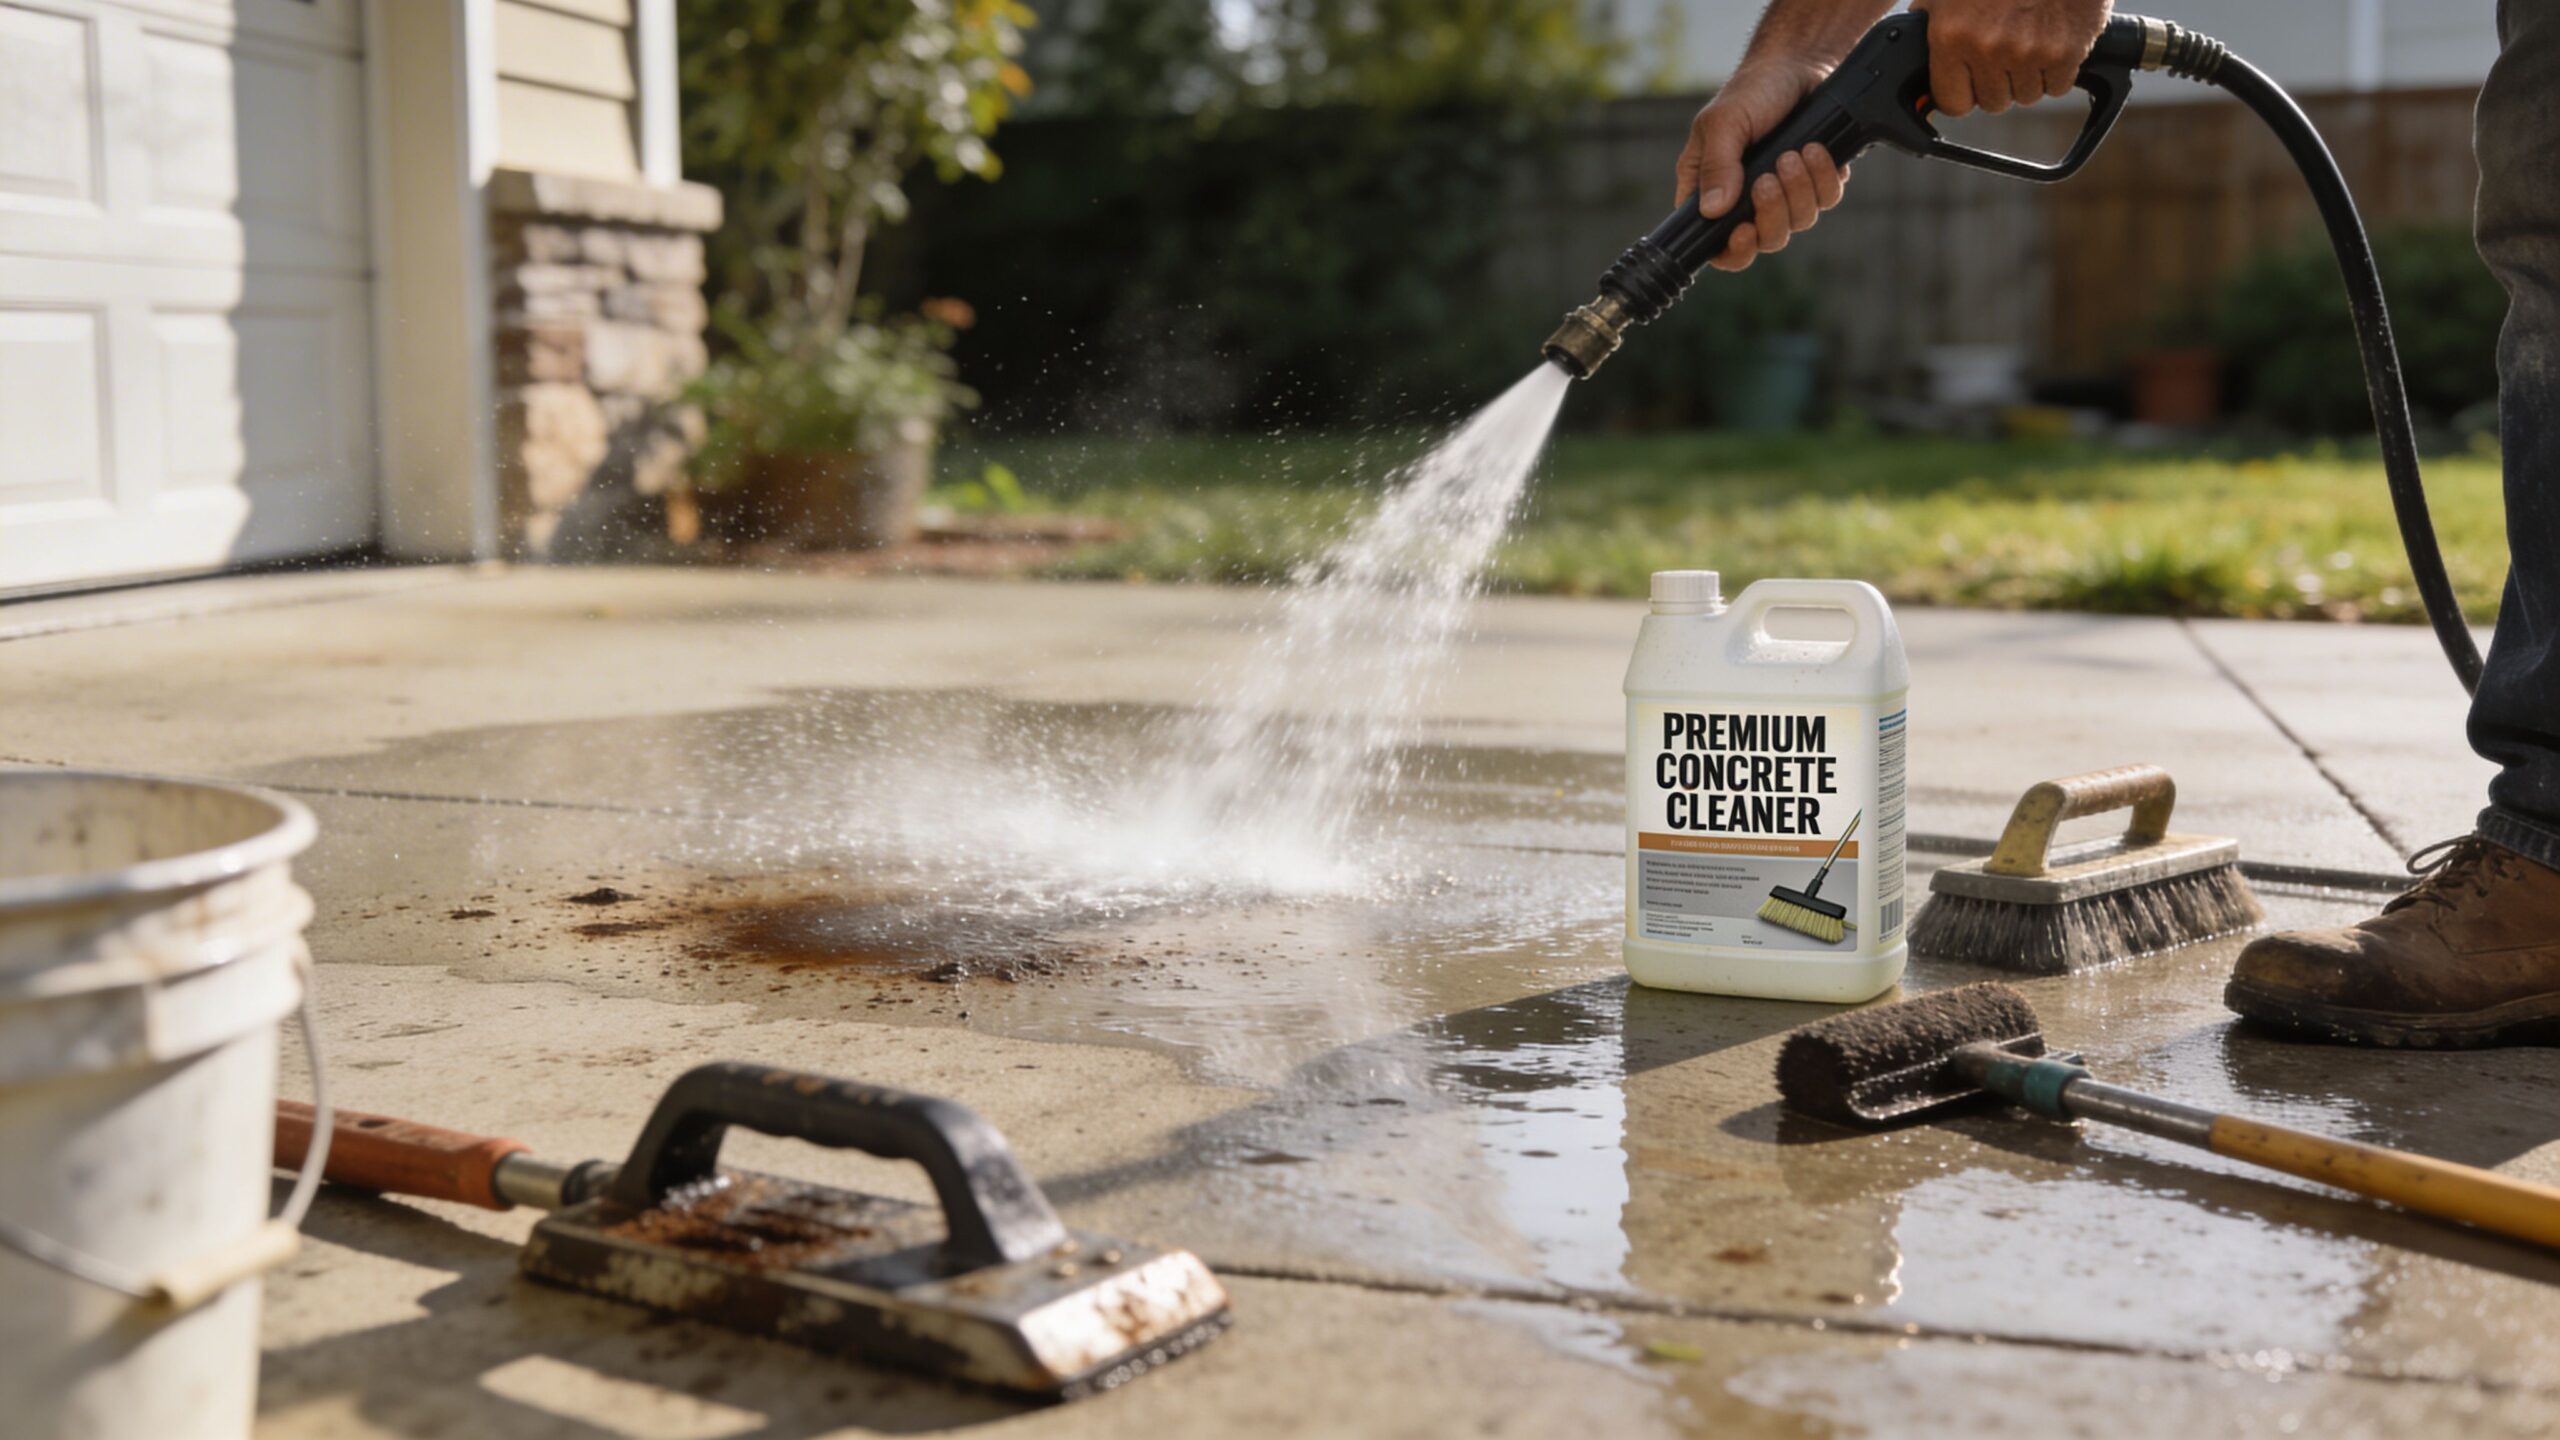
Pressure washing is not a light rinse
Driveways in Central Florida collect algae, mildew, dirt film, and tannin staining fast. A garden hose won’t touch that. Use a powerful pressure washer if you’re doing this yourself, and keep the wand moving so you don’t scar the slab.
Oil stains deserve special attention. If oil remains in the pores, the resurfacer may not bond well.
Use a commercial concrete degreaser, a stiff brush, and repeat the treatment until the surface is as clean as you can get it. That step takes patience. It’s one of the places homeowners rush, and it shows later.
Repair cracks and damaged spots before overlay goes down
Resurfacer is a finish coat, not a void filler. Any crack, chip, or broken area that needs repair should be addressed first.
Use the right material for the defect:
- Small cracks: A compatible crack filler works for minor, stable defects
- Larger damaged areas: A cementitious repair mortar is better for deeper surface loss or small depressions
- Broken edges: Rebuild them before resurfacing so the new coat has a sound perimeter
Let repairs cure according to the product instructions. If you rush this part, the repairs can telegraph through the new finish.
The best-looking overlay in the world won’t stay down on a dirty, sealed, oily, or dusty slab.
Surface profiling is the step many DIY jobs skip
A resurfacer needs mechanical grip. That means the slab needs texture. If the driveway is slick, sealed, or power-troweled smooth, you need to roughen it.
Professional crews often use mechanical grinding or similar methods to produce a proper bonding profile. That work is loud, dusty, and not glamorous, but it’s what gives the overlay something to bite into.
If the slab has existing expansion joints, keep them functioning. Don’t bury or randomly bridge them. Joint movement still exists after resurfacing. If you want a better grasp of why those joints matter, this page on what is a concrete expansion joint is worth reviewing.
Get the moisture condition right
One detail that matters in Florida is surface dampness. A bone-dry slab in heat can pull moisture out of the resurfacer too quickly. A puddled surface is also wrong.
You want the concrete clean, prepped, and damp, not wet. That usually means washing ahead of time, then letting surface water dissipate before application.
Here’s the balance to aim for:
| Surface condition | Result |
|---|---|
| Dusty and dry | Weak bond and fast surface drying |
| Puddled or glossy wet | Dilution and poor adhesion |
| Clean and damp | Better working time and bond |
What works and what doesn’t
Some prep habits consistently produce better results. Others cause failures.
What works
- Mechanical cleaning: Pressure washing plus grinding when needed
- Targeted stain removal: Especially on oil-contaminated areas
- Separate crack repair: Don’t expect resurfacer to hide structural defects
- Joint awareness: Preserve movement joints instead of covering them blindly
What doesn’t
- Quick wash and go: Dirt left in pores becomes a bond breaker
- Applying over old sealer: The new coat may release from the slab
- Ignoring soft spots: They often break later under traffic
- Rushing after rain: Trapped moisture causes problems in humid weather
If you want a resurfaced driveway that lasts, prep is the job. The overlay itself is the visible part. The bond underneath is what decides whether the project succeeds.
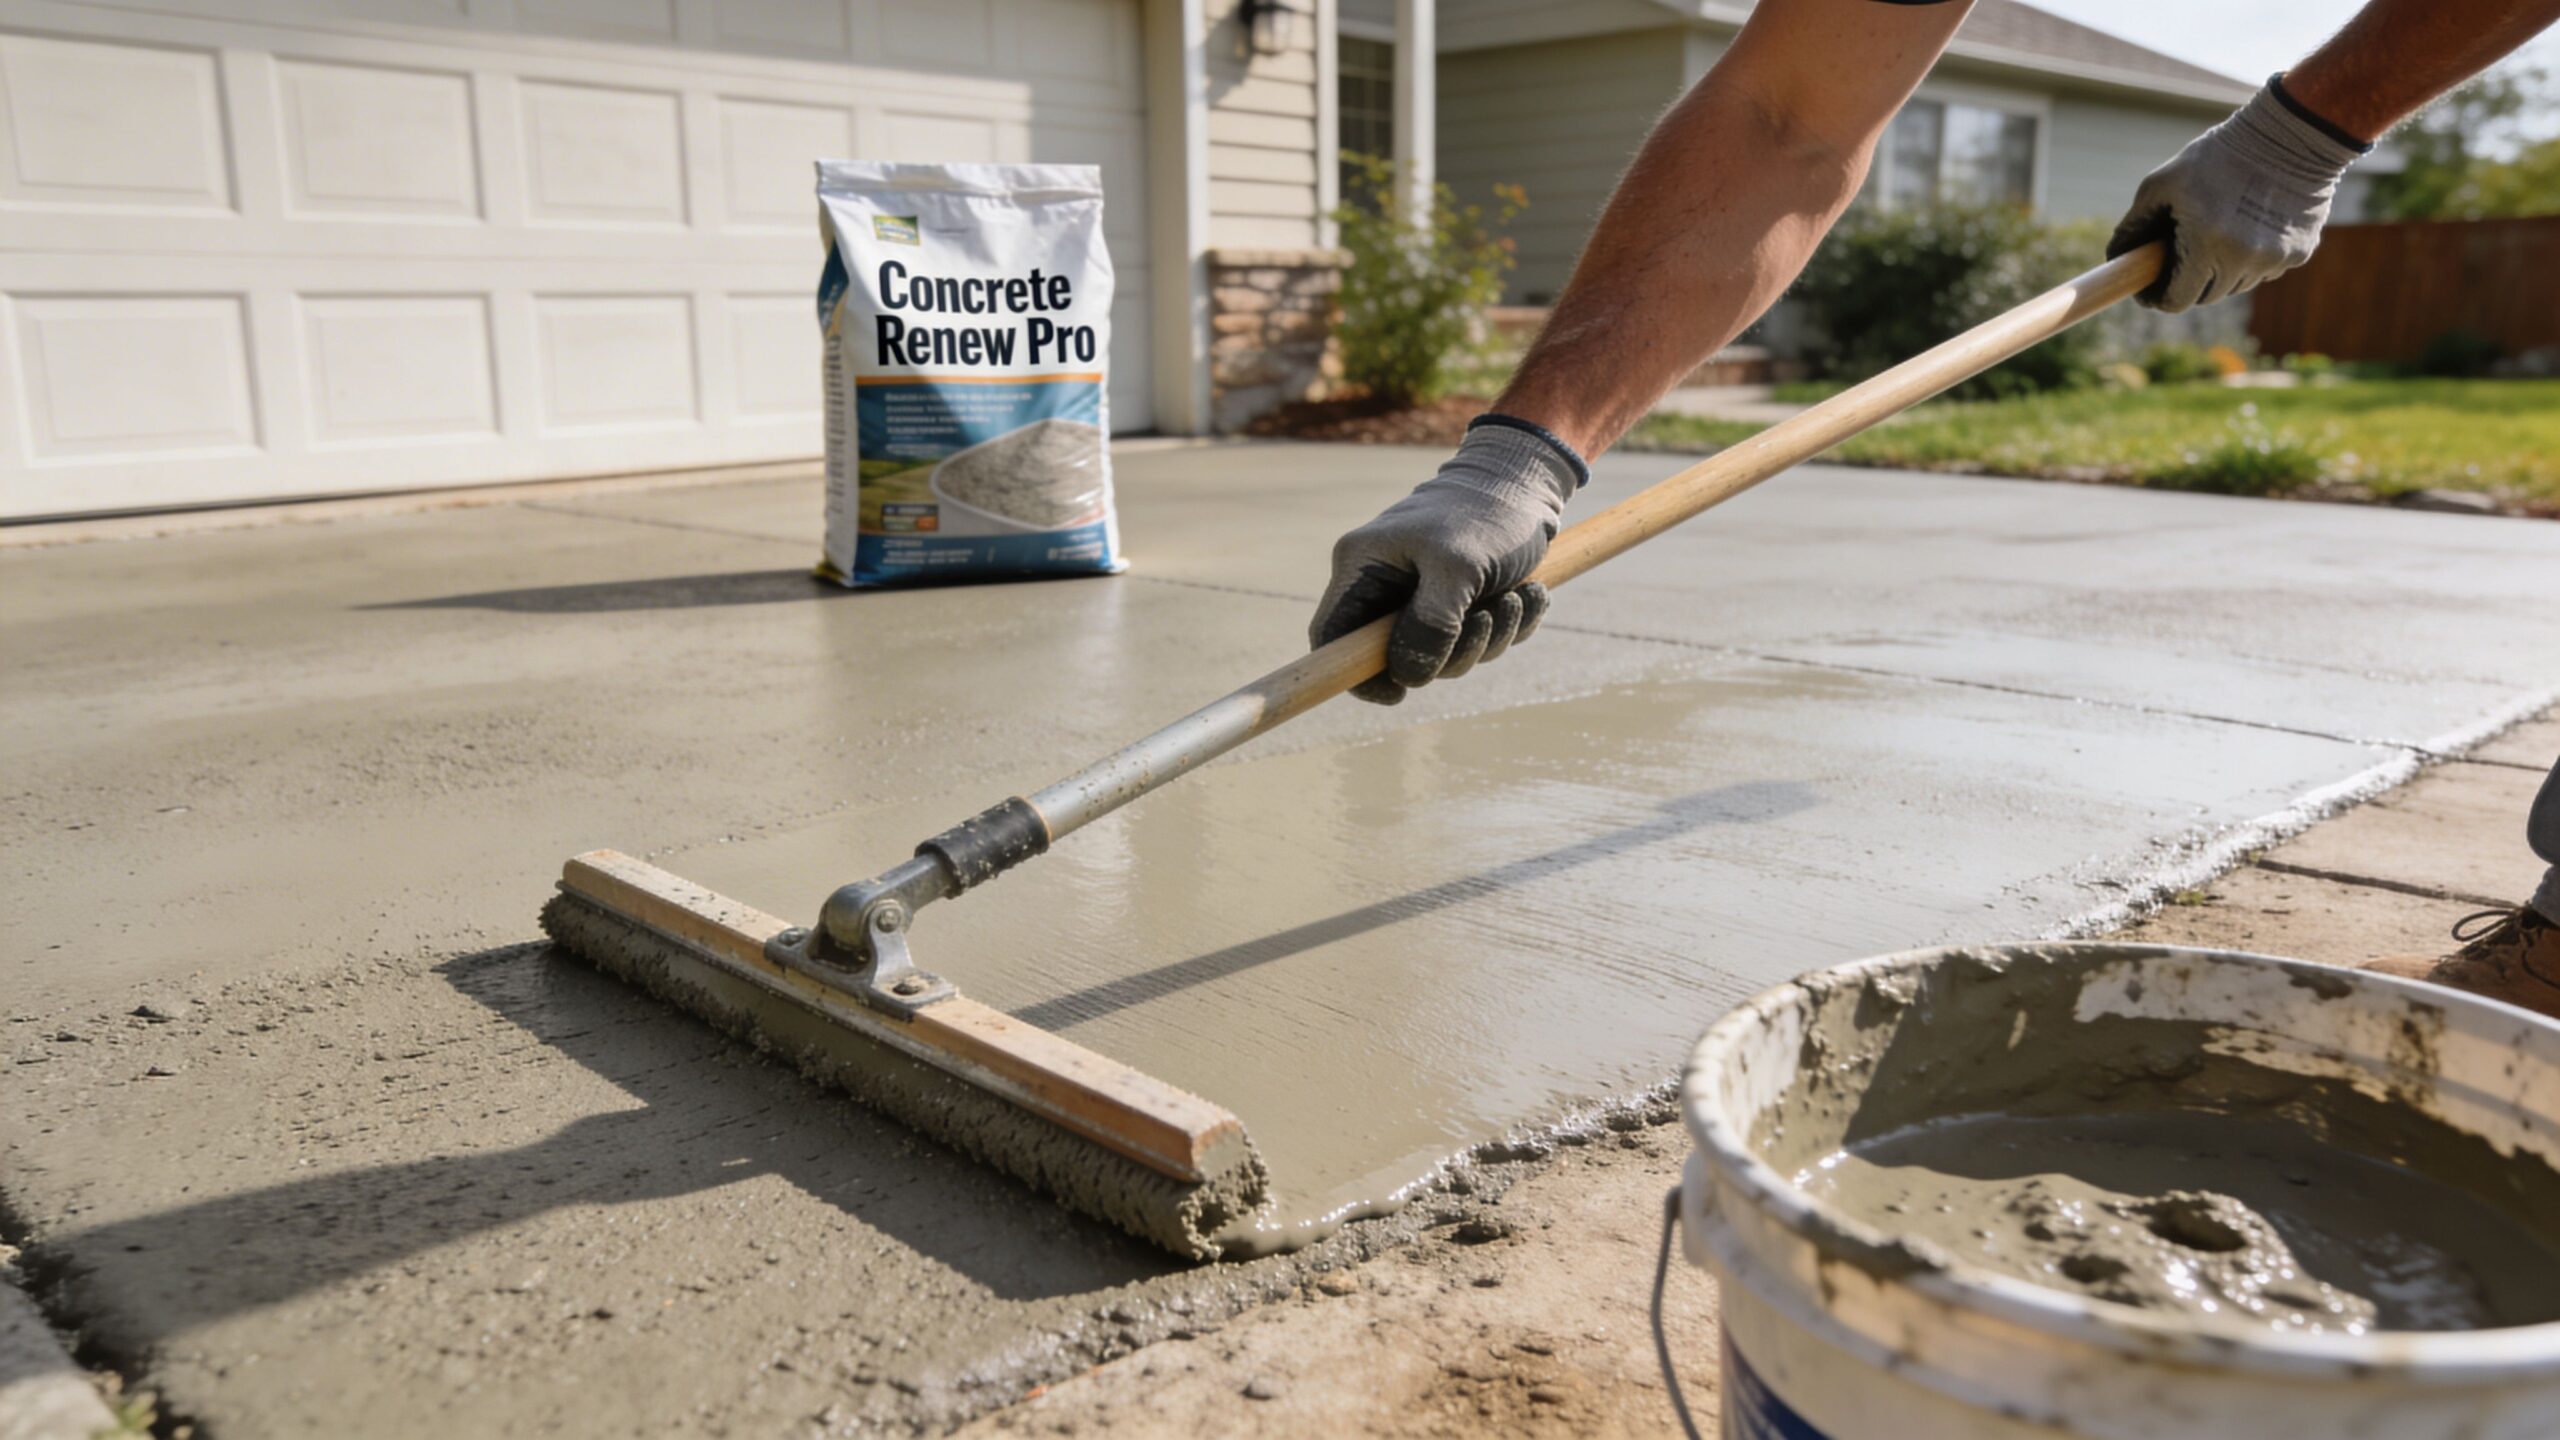
Mixing and Applying Concrete Resurfacer
Once the slab is clean, repaired, and properly profiled, the work speeds up. That’s why application day needs a plan before the first bag is opened.
Use a polymer-modified resurfacing product made for exterior concrete. That type of overlay is the standard choice when durability and flexibility matter. In Florida, that matters a lot because the surface has to handle wet conditions, heat, and constant UV exposure.
Mix small batches and keep them consistent
Read the product instructions and follow them exactly. Don’t guess on water. Don’t add extra water to make the mix “easier.” That’s one of the fastest ways to weaken the finish.
A heavy-duty drill with a mixing paddle works best. Mix until the material is smooth and lump-free. The goal is a pourable, spreadable consistency that holds together without turning soupy.
Good application setup usually includes:
- Mixing station: Buckets, water, paddle mixer, and unopened bags staged in shade
- Application tools: Long-handled squeegee, gauge rake if needed, finishing broom
- Crew timing: One person mixing, one pouring, one spreading is ideal on larger areas
- Weather awareness: Don’t start if rain is threatening or the slab is overheated
Pour in ribbons and maintain a wet edge
Don’t dump one giant pile in the middle of the driveway. Pour the material in manageable ribbons, then pull it evenly with a long-handled squeegee.
The key is to maintain a wet edge. That means each new pass blends into material that hasn’t started to set. If one section begins to dry before the next section reaches it, lap marks show up. On a driveway, those marks are hard to ignore.
A practical sequence looks like this:
- Start at the far end and work toward your exit point.
- Pour a ribbon across part of the slab.
- Spread it evenly with consistent pressure.
- Back-roll or smooth as needed for uniform coverage.
- Repeat without stopping long enough for edges to skin over.
Field advice: The driveway doesn’t care if you’re tired. Once mixing starts, the pace has to stay steady.
Watch the slab temperature in Florida
In Summerfield, Belleview, or Silver Springs, concrete can heat up fast. A hot slab shortens working time and makes finishing harder. If the surface is too warm, the material can tighten up before you’ve spread it well.
That’s why many experienced crews work early, avoid the hottest window of the day, and pre-dampen the slab as part of prep. You’re not trying to leave standing water. You’re trying to keep the concrete from pulling moisture out of the overlay too aggressively.
Avoid direct blazing sun when possible. Shade, timing, and batch control matter more in Florida than many homeowners expect.
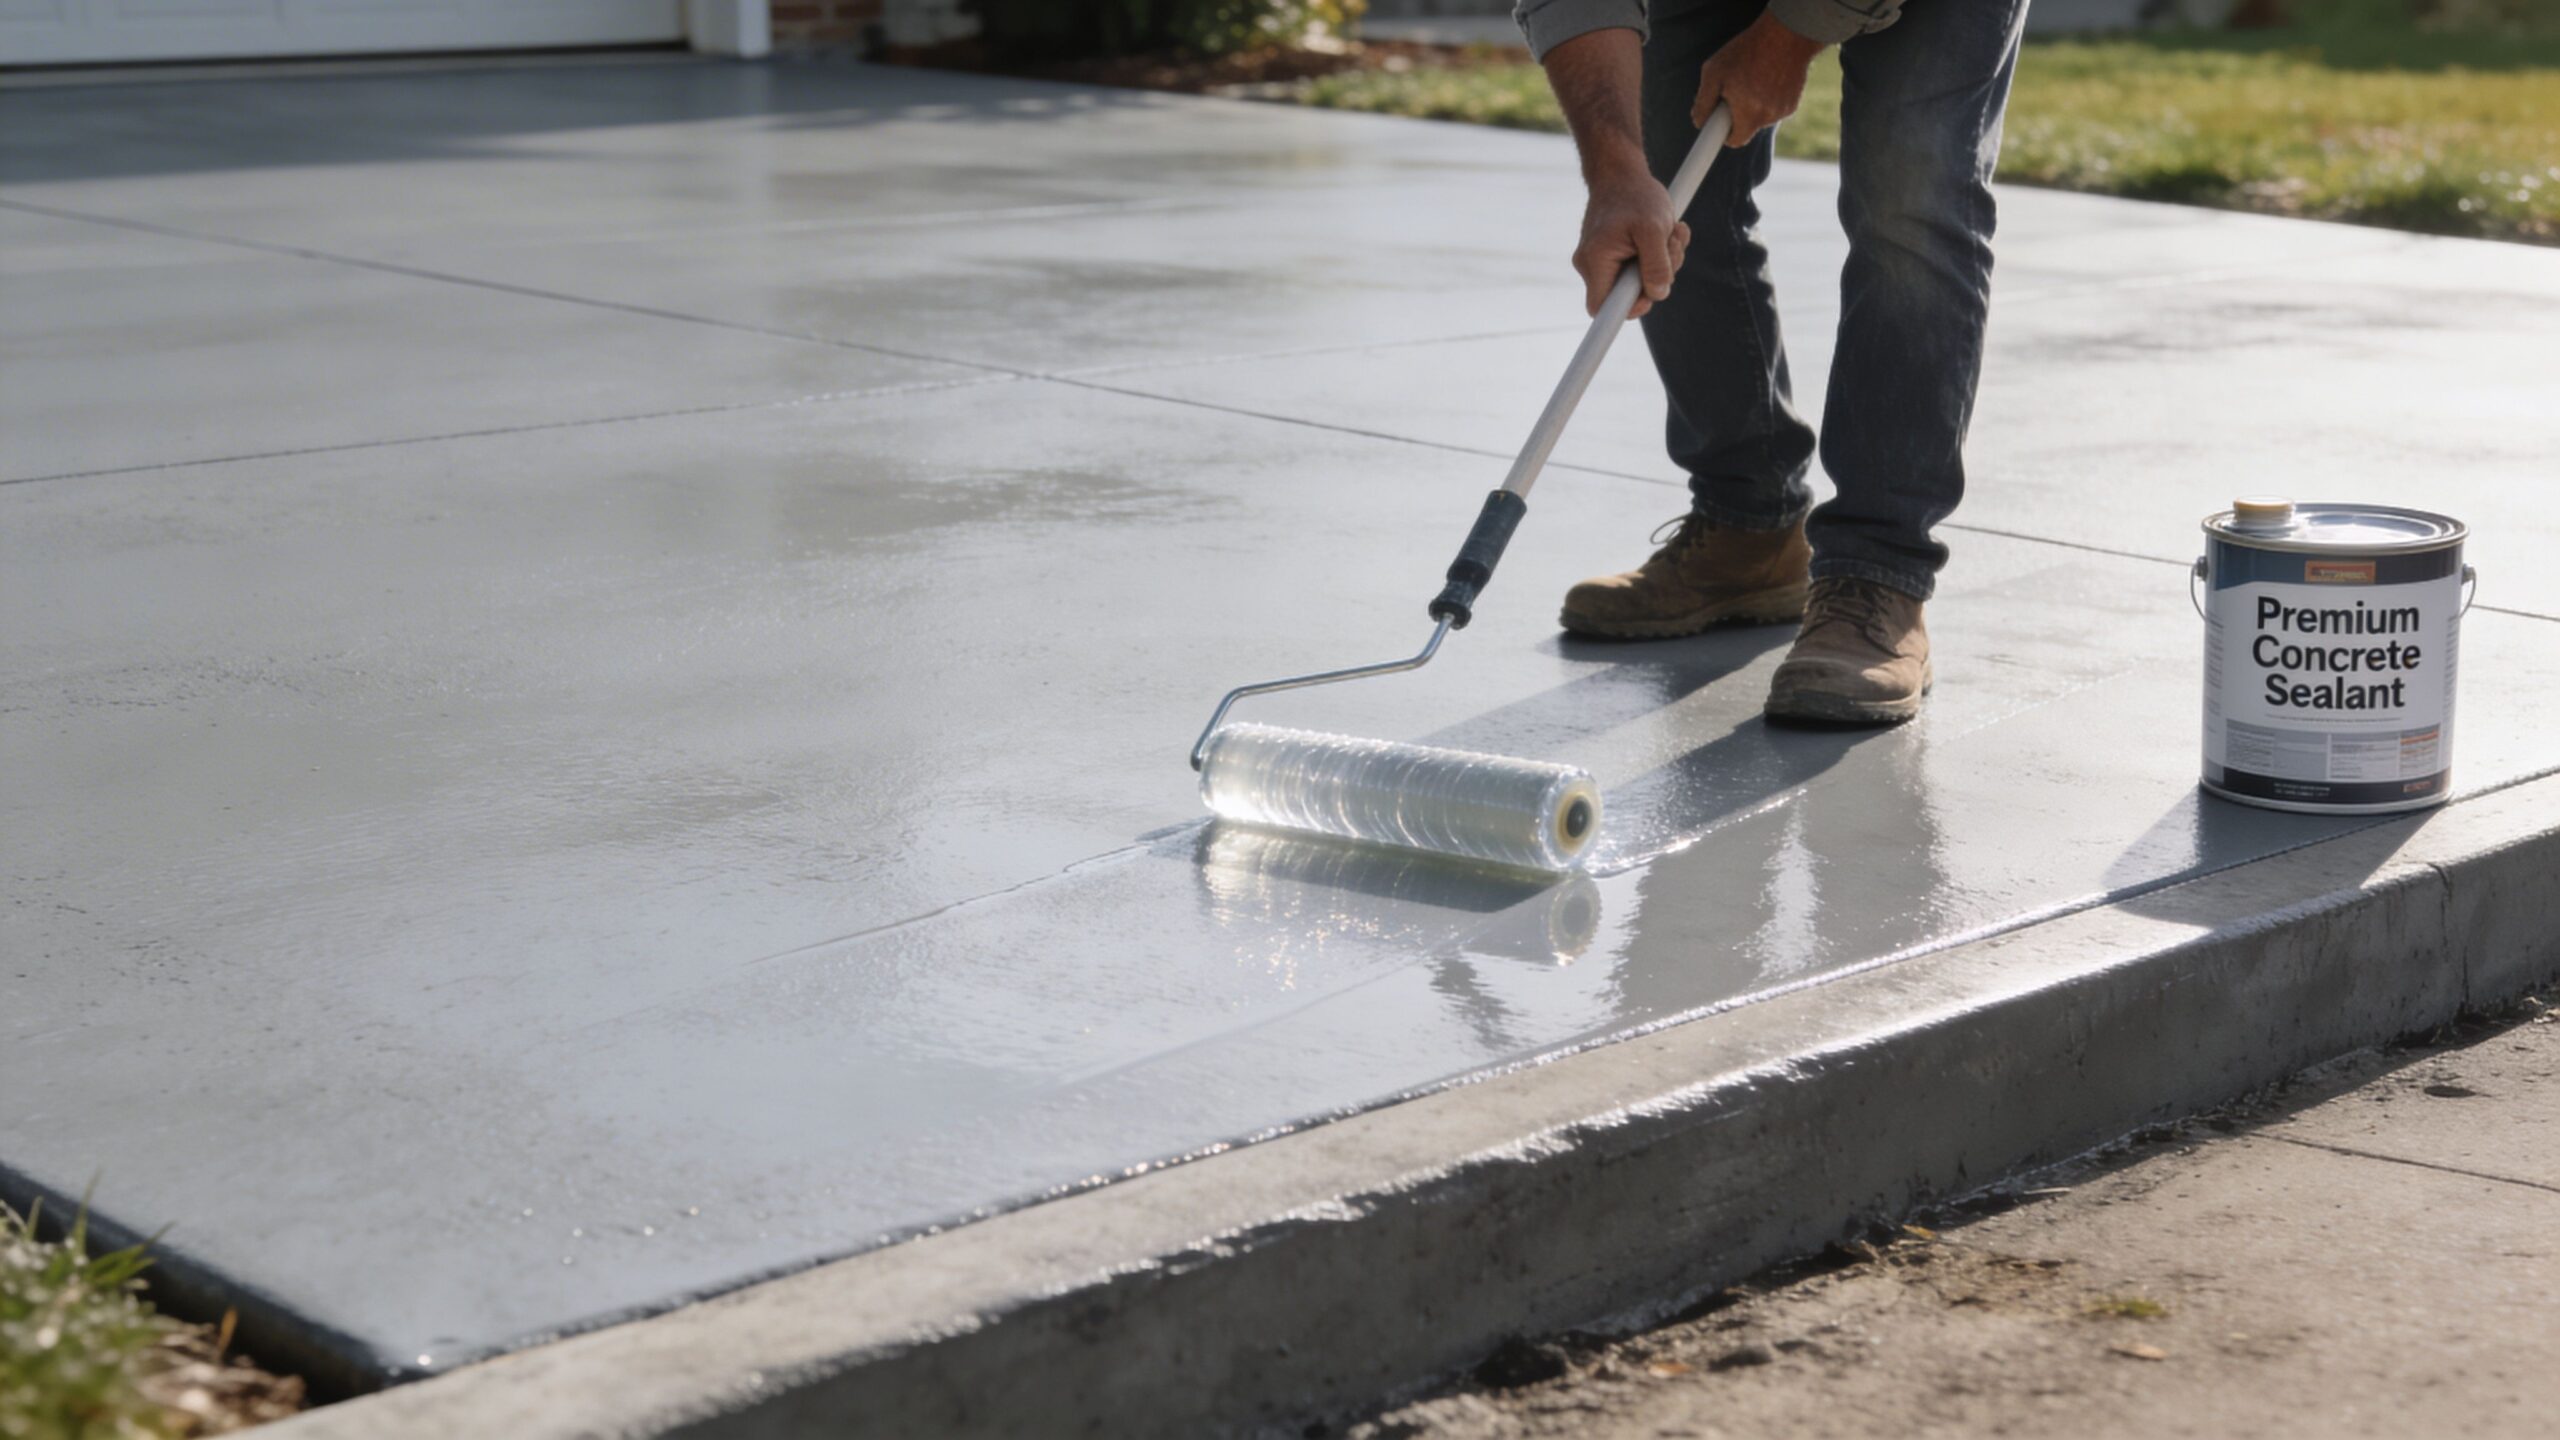
Texture matters as much as smoothness
A driveway should look clean, but it also needs traction. Don’t overwork the surface trying to make it look like polished interior concrete. In wet weather, that can become slick.
A lightly textured finish is usually the safer choice for exterior slabs. It also hides minor application variation better than an ultra-smooth finish.
Here’s a practical visual reference for the application process:
Common mistakes during application
Most problems during this phase come from speed, weather, or mix inconsistency.
| Mistake | What happens |
|---|---|
| Adding extra water | Weaker surface and inconsistent finish |
| Mixing too much at once | Product starts setting before placement |
| Stopping between pours | Lap marks and visible seams |
| Working on a hot slab | Dragging, flashing, and short working time |
| Chasing perfection too long | Surface gets overworked |
If you’re learning how to resurface a concrete driveway, this is the stage where DIY often becomes risky. The material doesn’t wait while you rethink your next move. Good results come from preparation, steady pace, and realistic control of the working conditions.
Finishing Curing and Protecting Your New Driveway
A lot of resurfacing jobs look good for a day and fail in the weeks that follow. In Central Florida, the finish can skin over fast in the heat, then get hit with overnight moisture, morning dew, or an afternoon storm before it has cured the way it should. That is why the last part of the job decides whether the driveway holds up or starts showing trouble early.
Add the right finish for traction
For most residential driveways here, a light broom finish is the safest call. It gives you grip in wet weather, hides minor variation in the overlay, and still cleans up well.
Timing matters. Broom it too soon and the surface pulls or tears. Wait too long and the broom barely marks it. The right moment is when the overlay has tightened up enough to hold the texture without dragging loose material.
Traction matters more in Florida than many homeowners expect. A smooth-looking driveway may photograph well, but during a summer rain it can become slick fast.
Respect the cure time
A resurfaced driveway is not ready just because it looks dry. The surface often firms up before the material underneath has enough strength for foot traffic, rolling loads, or tire pressure.
Keep people off it until the product has set for safe use. Keep vehicles off it until the full cure window in the manufacturer instructions has passed. On real jobs, I also tell owners to avoid sharp turning, parked trailers, and heavy point loads right after reopening the driveway. Those are the marks that show up first.
Early use is one of the most common DIY problems I see. Someone walks across it too soon, parks on it the next day, or turns the wheel while backing in. The finish scars, and those scars usually stay.
Seal it after the overlay has fully cured
Sealer protects the work from water, stains, UV exposure, and the wear that comes with daily traffic. In Central Florida, moisture protection is a big part of the equation, but the sealer also needs to fit the slab and the overlay system. A bad sealer choice can trap moisture and create its own problems.
Breathability matters here. If the slab has moisture movement and the coating above it cannot release that vapor, peeling and whitening become much more likely. That is one reason some driveways are better handled by a local driveway paving and concrete contractor than by a weekend DIY crew.
A resurfaced driveway can last a long time with proper curing and periodic resealing. It also needs realistic expectations. Sealer is protection, not a fix for slab movement, poor drainage, or a base that is already failing.
Practical aftercare
Once the driveway is back in service, steady maintenance does more good than occasional heavy cleanup:
- Wash off dirt, algae, and leaf stain buildup: Wet Florida conditions feed surface discoloration fast
- Clean oil, fertilizer, and rust marks early: They are easier to remove before they set
- Watch joints and small cracks: Minor movement is easier to address before water gets underneath
- Reseal on schedule: Do it before the surface turns chalky, worn, or patchy
If the slab starts showing recurring cracks, flaking, or moisture-related peeling even after proper aftercare, the problem usually goes deeper than the surface. At that point, resurfacing stops being a maintenance issue and becomes a replacement conversation.
Why Central Florida Projects Demand Local Expertise
A resurfacing guide can teach the process. It can’t replicate experience with local weather, soil conditions, and scheduling judgment. That’s the difference on real projects in Marion County and Citrus County.
In humid subtropical climates like Central Florida, 30-50% of DIY resurfacing projects fail within 2-5 years because of moisture-related problems. Professional-grade polymer-modified overlays and breathable sealers are important in 80-90% humidity to help prevent delamination, according to Brickform’s discussion of concrete driveway resurfacing in humid conditions.
Florida exposes shortcuts fast
Humidity changes working conditions. Afternoon storms interrupt cure windows. Strong sun speeds up surface drying. If a driveway was only half-cleaned, poorly profiled, or coated with the wrong material, those weaknesses don’t stay hidden long.
That’s why local judgment matters more than a generic how-to list.
A seasoned contractor knows when:
- The slab is too far gone for resurfacing
- Moisture conditions make application risky
- A driveway needs replacement instead of a cosmetic fix
- A breathable sealer is the right follow-up
- A homeowner would be better served by new concrete altogether
The long-term decision is not always resurfacing
Sometimes replacement is the smarter move. If the slab is unstable, if drainage is poor, or if edges and joints are breaking down, resurfacing may only postpone the inevitable.
That’s especially true on older driveways with repeated patch history or visible settlement. In those cases, new concrete often gives the better long-term result.
For property owners comparing resurfacing versus replacement, it helps to review a local service option like this driveway paving contractor near me page to understand what full replacement typically involves.
A good contractor doesn’t try to sell every driveway the same fix. The right answer depends on the slab.
One contractor, more than one service line
This is also where many owners in Ocala, Inverness, Dunnellon, and The Villages benefit from hiring a company that handles both concrete construction and asphalt maintenance, not just one side of the business.
That matters because many properties need more than a driveway overlay. They may also need:
| Property type | Common needs |
|---|---|
| Residential homes | Driveway replacement, patios, walkways, sealing |
| HOAs | Sidewalk repairs, common-area concrete, striping refresh |
| Retail centers | Parking lot striping, ADA-compliant markings, seal coating |
| Churches and schools | Safe walk routes, directional markings, durable concrete flatwork |
| Property managers | Ongoing maintenance programs with reliable scheduling |
A local full-service contractor can provide an honest evaluation of the driveway, then handle related work across the site. That’s often more efficient than hiring one company for concrete and another for asphalt markings and maintenance.
Frequently Asked Questions for Florida Property Owners
Here are the questions that come up most often from homeowners, HOAs, and commercial property managers around Marion County and Citrus County.
Common Questions About Concrete & Asphalt Maintenance
| Question | Answer |
|---|---|
| How long does a professionally resurfaced concrete driveway last in Florida? | On a structurally sound slab, a professionally installed polymer-modified overlay typically lasts many years, with longer life possible under favorable conditions and good maintenance. |
| When should a driveway be replaced instead of resurfaced? | Replacement is usually the better call when the slab has major cracking, movement, sinking, or base deterioration. An overlay won’t correct those underlying problems. |
| How long should I stay off a resurfaced driveway? | Keep vehicles off the driveway for about a week so the resurfaced system can develop the strength needed for normal residential traffic. |
| Is resurfacing the same as sealing? | No. Resurfacing adds a new cement-based layer to restore the surface. Sealing is a protective treatment applied to help guard concrete or asphalt from weather, moisture, and staining. |
| Do you offer more than residential driveway work? | Yes. Full-service pavement contractors in Central Florida often handle concrete driveways, patios, sidewalks, demolition and replacement, asphalt seal coating, parking lot striping, and ADA-compliant markings for commercial sites. |
| What areas do you serve? | Service commonly includes Marion County and Citrus County, with work in Ocala, Dunnellon, Belleview, Silver Springs, Summerfield, Crystal River, Homosassa, Inverness, Lecanto, Beverly Hills, Hernando, and The Villages. |
If you’re unsure whether your slab qualifies for resurfacing, the safest first step is an on-site assessment. That’s especially true if the driveway has uneven sections, recurring ponding, or crack patterns that suggest movement instead of surface wear.
If your property needs more than a quick patch, Riverside Sealing & Striping, LLC provides free, no-pressure estimates for concrete and asphalt work across Marion County, Citrus County, and surrounding Central Florida communities. From concrete driveway installation and replacement to patios, sidewalks, asphalt seal coating, parking lot striping, and ADA-compliant markings, the team handles residential and commercial projects with reliable scheduling, fast turnaround, and long-lasting craftsmanship.