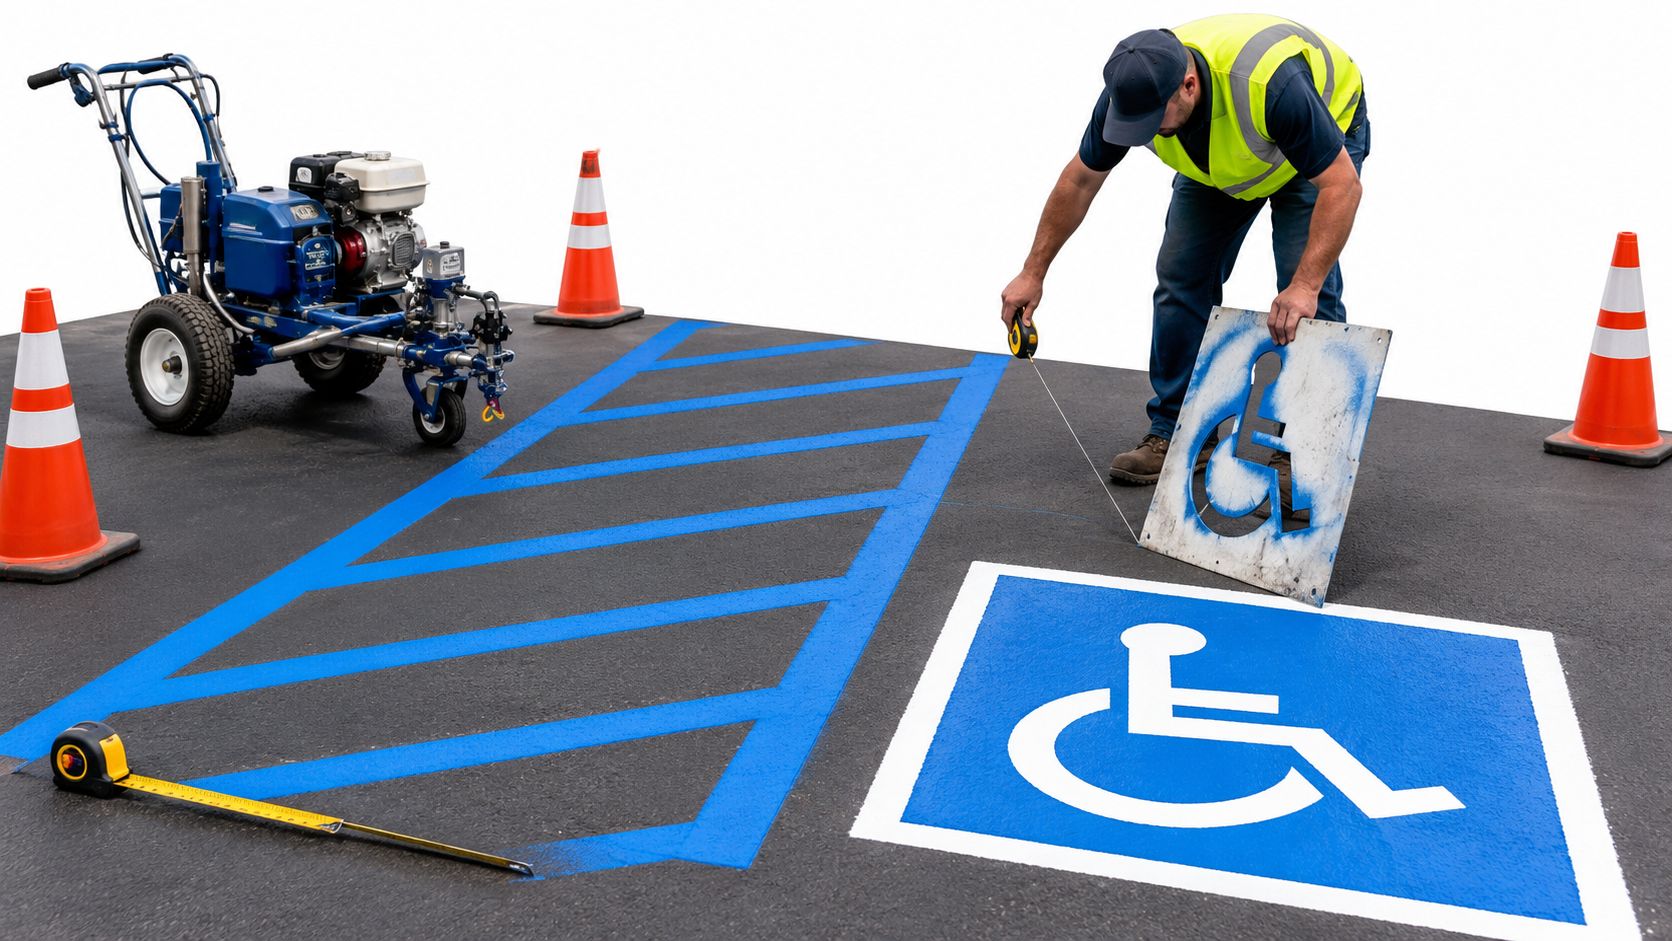
A standard accessible parking stall must be 96 inches wide with a 60-inch access aisle. A van-accessible stall needs either 132 inches with a 60-inch aisle or 96 inches with a 96-inch aisle, the surface slope can't exceed 1:48, and Florida requires blue paint plus a sign with its bottom 84 inches above finished grade.
That's the part many property managers in Dunnellon, Ocala, Crystal River, and the surrounding Central Florida area need before anyone unloads a striper. A fresh symbol painted over the wrong layout still leaves the property exposed, and a correctly measured space can still need rework if Florida's color and signage requirements are missed.
I've seen this happen on small commercial lots across Marion County, FL and Citrus County, FL. The owner wants a quick repaint, but the old lines have faded, a dumpster pad has narrowed the aisle, or a parking surface that looks flat drains toward the accessible route. The job starts as a paint project and turns into a layout, slope, access, and sign-placement problem.
The reliable way to paint handicap parking spaces is to separate federal ADA geometry, Florida code requirements, and local inspection expectations before paint reaches the pavement. That approach works for retail properties, churches, HOAs, medical offices, and commercial lots serving communities from Belleview and Silver Springs to Summerfield, The Villages, Homosassa, Inverness, Lecanto, Beverly Hills, and Hernando.
Table of Contents
- What ADA and Florida Actually Require Before You Paint
- Measuring and Chalking the Layout on the Pavement
- Choosing the Right Paint and Stencil for Florida Lots
- Spraying Lines, Hatching Aisle, and Stenciling the Symbol
- Mounting the Accessible Parking Sign to Florida Code
- When a Property Owner Can DIY and When to Call a Pro
- Maintenance Schedule to Keep Spaces Compliant Year-Round
What ADA and Florida Actually Require Before You Paint
Start with the layout, not the color chart. The ADA parking guidance from the U.S. Department of Justice requires a standard accessible car space to be at least 96 inches wide, paired with an access aisle at least 60 inches wide. A van-accessible arrangement uses either a 132-inch space and 60-inch aisle or a 96-inch space and 96-inch aisle. The slope across the space and aisle can't exceed 1:48 in any direction.
The access aisle is the usable loading area. If a wheel stop, landscape island, curb, dumpster enclosure, or drainage edge intrudes into it, the painted border may look correct while the space fails in practice. The ADA also requires the space to be marked so its width is defined, which makes restriping a compliance task rather than a cosmetic touch-up.
Florida adds its own visible requirements. The Florida Building Code says each accessible parking space must be prominently outlined with blue paint and repainted when necessary so it remains clearly distinguishable. The sign must be permanent, mounted above grade, and carry the caption “PARKING BY DISABLED PERMIT ONLY.” Its bottom must be 84 inches above the ground, according to the Florida Building Code accessibility provisions.
| Requirement | Federal ADA | Florida Code |
|---|---|---|
| Standard stall | 96 inches minimum wide | Blue outline required |
| Access aisle | 60 inches minimum | Marking must remain clearly distinguishable |
| Van-accessible layout | 132-inch stall with 60-inch aisle, or 96-inch stall with 96-inch aisle | Apply the state color and sign requirements |
| Surface slope | No more than 1:48 in any direction | State overlay does not replace the federal slope rule |
| Sign | Accessible parking identification is required | Caption and 84-inch bottom mounting height apply |
Before staging paint, verify the space count, the stall and aisle widths, the slope in every direction, the route to the entrance, and the sign location. On small Marion and Citrus County lots, drainage is a frequent trap. A surface can appear level from the driver's seat while still falling beyond the allowed ratio.
For a practical cross-check of layout and marking details, use these ADA handicap parking space requirements alongside the applicable local review process. Photograph the existing lot, record your measurements, and resolve discrepancies before ordering materials.
Measuring and Chalking the Layout on the Pavement
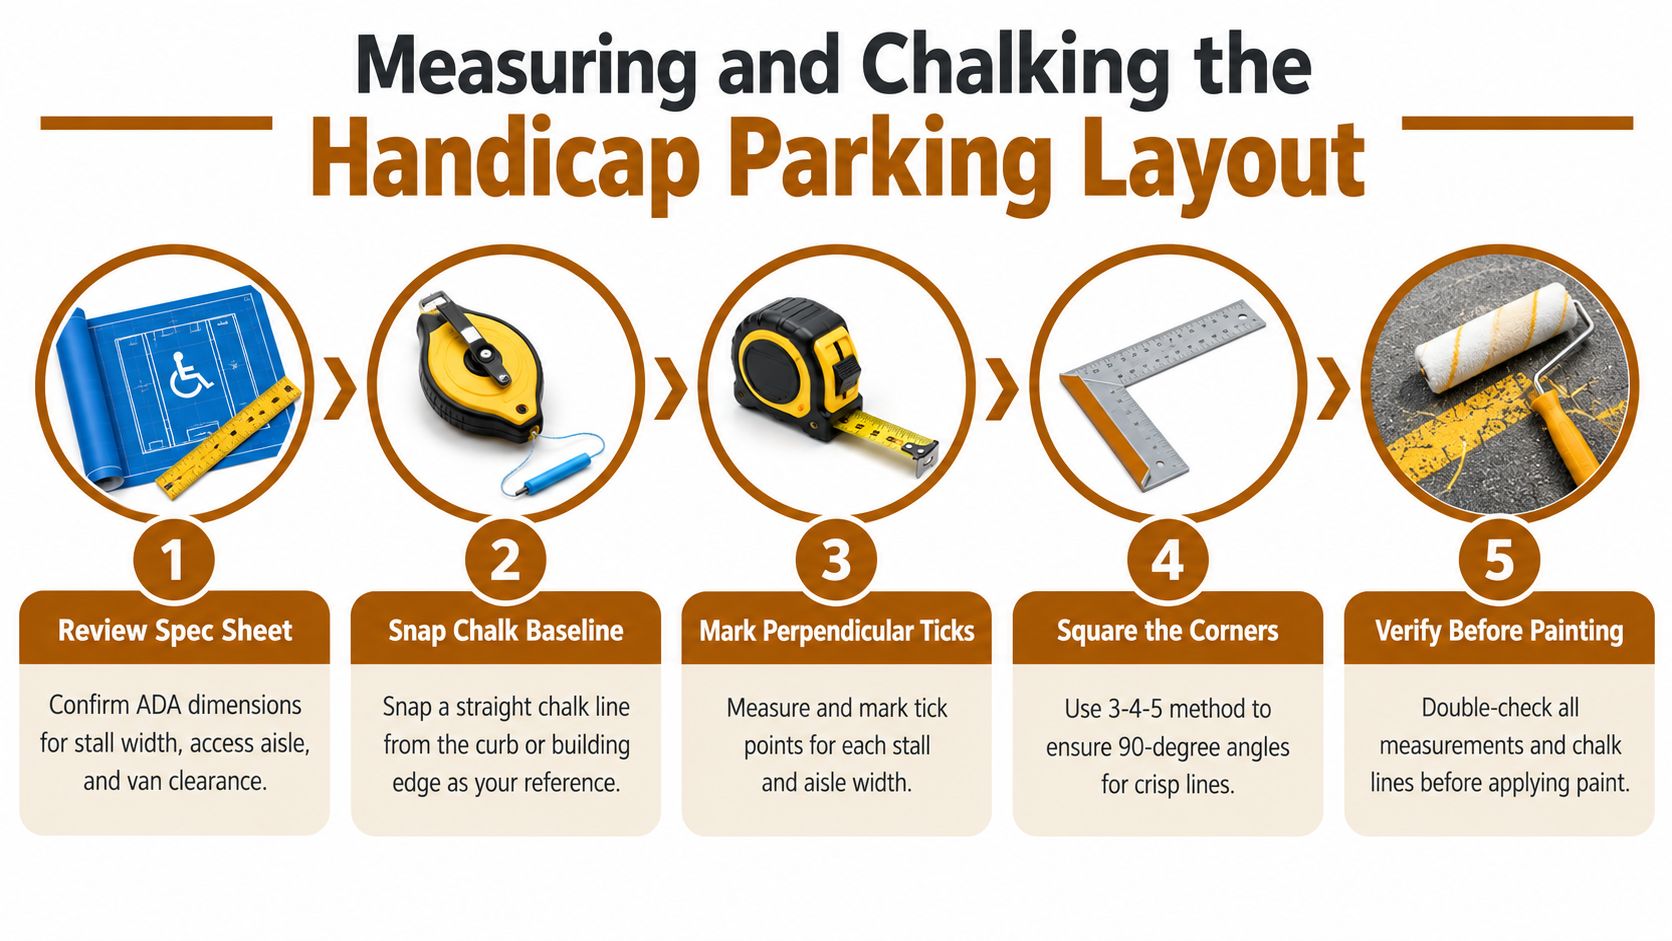
A good layout begins with a reliable reference line. Snap a chalk baseline parallel to the curb or building edge, then use a 100-foot tape to establish perpendicular tick marks for each stall and aisle. Don't trust faded striping as your only guide, especially where earlier crews compressed spaces around islands or shifted a row to avoid a light pole.
For a row containing a standard accessible space, a van-accessible space, and an adjoining standard stall, mark each boundary independently. Give the standard accessible space its 96-inch width and 60-inch aisle, then give the van space its 96-inch aisle when using the 96-inch stall configuration. Confirm that the access aisles remain unobstructed by curbs, ramps, wheel stops, dumpster pads, or posts.
Use a chalk reel for long straight lines. For square corners, check the layout with a framing square or a 3-4-5 method rather than assuming the curb is straight. Mark diagonal hatch lines in chalk before painting so the spacing and direction are settled while corrections are still easy.
Lock the geometry before equipment arrives
Cone off the work area and photograph the completed chalk layout. Those photographs help the owner, crew, and inspector see what was approved before paint covers the reference marks.
Check the surface with a 24-inch digital level at all four corners of every stall and aisle. The ADA restriping guidance recommends measuring and chalking the full bay first, marking the aisle boundary next, and applying border lines, hatching, and the symbol only after the geometry is established.
Before firing up the striper, ask four questions:
- Width: Does every stall match the selected configuration?
- Aisle: Is the full loading area clear from curb to route?
- Slope: Does each reading stay within the allowed 1:48 ratio?
- Visibility: Will the finished symbol and sign be visible from the approach?
If any answer is uncertain, don't spray. Correcting chalk takes minutes. Removing cured traffic paint takes equipment, labor, and patience.
The video below shows the kind of layout sequence crews can review before starting a restriping project.
Choosing the Right Paint and Stencil for Florida Lots
Florida pavement markings face intense sun, hot tires, sudden rain, and dirt carried into the surface by runoff. The right paint depends on whether the lot is a lightly used office property or a commercial site where vehicles turn across the accessible aisle all day.
| Paint Type | Expected Lifespan | Best For | Considerations |
|---|---|---|---|
| Water-based acrylic | Around 2 to 4 years | Most small-lot repaints and DIY work | Low odor and fast drying, but vulnerable to early wash-off if applied before the surface and weather are ready |
| Solvent-based alkyd | Around 4 to 6 years | Busier commercial properties | More durable, with stronger fumes and a longer cure |
| Chlorinated rubber | Around 5 to 7 years | High-turnover lots needing a tougher coating | Harder to find and more difficult to clean up |
These lifespan ranges come from the provided trade comparison, not from a universal guarantee. Pavement condition, application thickness, traffic, weather, and product instructions still control the outcome.
For most small Central Florida repainting work, water-based acrylic is practical when the pavement is clean and dry and the forecast gives the coating time to set. A solvent-based alkyd makes more sense where tires turn sharply over the markings or the lot handles steady commercial traffic. Chlorinated rubber can offer greater resistance, but its availability and cleanup requirements make it less convenient for occasional maintenance.
Select the stencil for repeatability
The International Symbol of Accessibility stencil should meet the MUTCD minimum of 28 inches high by 24 inches wide, as summarized in this technical guide to ADA and line-striping essentials. A mylar-backed stencil produces cleaner edges and can be cleaned for future touch-ups. A disposable fiberboard stencil costs less up front, but it softens, shifts, and produces rougher edges after repeated use.
A supplier-ready bill of materials should include:
- Blue traffic paint for the stall outline and access-aisle marking.
- White contrast paint for the accessibility symbol.
- A 28-by-24-inch stencil sized for the required symbol.
- A gallon of clear sealer, if compatible with the selected traffic paint and pavement.
- Chalk, masking materials, weights, cones, and cleaning supplies.
Don't apply clear sealer over paint unless the paint manufacturer approves that combination. A mismatched topcoat can soften the marking or create a slick surface.
Spraying Lines, Hatching Aisle, and Stenciling the Symbol
Paint the geometry in layers. Start with the stall border lines, then complete the access-aisle hatching, and apply the symbol after the surrounding paint has set enough to prevent tracking and overspray.
A walk-behind airless striper should be held about 8 to 10 inches from the pavement for consistent coverage. Run two controlled passes on the border where needed, overlapping each pass by half the spray fan to avoid a broken, zebra-striped edge. At inside corners, especially where a wheel stop meets asphalt, back-roll carefully to prevent thin coverage and bleed.
Florida's state-specific requirement makes the access aisle especially important. Hatch the 60-inch aisle with diagonal stripes at least 4 inches wide, then use blue paint for the aisle marking rather than leaving the area visually ambiguous. Keep the stripes inside the chalked boundary, and stop before curbs, ramps, or other obstructions.
Practical rule: Paint the border and aisle from the chalked geometry. Don't use the old blue or white paint as your measuring reference.
The symbol goes in the stall center, with the figure facing the access aisle. Use the 28-by-24-inch stencil, hold it flat with weights, and spray two light coats instead of one heavy pass. Humidity and overspray make heavy applications prone to bleeding under the stencil edge.
For cleaner results, lift the stencil vertically once the paint has flashed but before it bonds hard to the pavement. Clean the stencil immediately if the product allows it. This handicap parking space symbol guidance is useful when checking symbol placement and contrast against the painted stall.
Don't open the space to traffic just because the surface looks dry. Follow the paint manufacturer's drying and curing instructions, and keep cones in place until tires won't pick up the coating.
Mounting the Accessible Parking Sign to Florida Code
A compliant painted space still needs a visible sign. Florida requires the accessible parking sign to be permanent and mounted so the bottom edge sits 84 inches above finished grade. Measure to the lowest edge of the sign, not to the post cap, the center of the panel, or the top of a supplemental plaque.
The main sign must display the international symbol of accessibility and the caption “PARKING BY DISABLED PERMIT ONLY.” A state-specific Florida reference lists a standard sign at 12 inches wide by 18 inches high, with green lettering and border on a white background, and an accessibility symbol 4 inches high in white on a blue background. It also lists a van-accessible version at 12 inches wide by 6 inches high. Confirm the final fabrication with the authority having jurisdiction and the current code documents before installation.
Separate the sign, stall, and van checks
A van-accessible space needs more than a different plaque. The stall and aisle must use one of the permitted configurations, and the sign must identify the space clearly. The main sign belongs at the front of the stall, centered where drivers can see it without a parked vehicle, landscaping, or lighting pole blocking the panel.
Use a breakaway post where the site layout calls for a freestanding sign. Galvanized or powder-coated steel is a sensible material choice for properties exposed to coastal air in Citrus County and parts of Marion County, where unprotected metal can rust quickly. Set the post outside the accessible route and preserve 36 inches of clear ground around it for forward approach.
For a van-accessible sign assembly, install the VAN ACCESSIBLE sub-plaque below the main sign. Position the post so the plaque sits between 60 and 66 inches high, following the applicable Florida sign reference and project review requirements.
The Florida handicap parking sign requirements should be reviewed before drilling the post base or attaching a sign to a building wall. Check that the sign remains readable from the approach, that the mounting surface is sound, and that the post won't interfere with the route from the aisle to the entrance.
| Requirement | Federal ADA (2010) | Florida Code | Local Inspector, Marion and Citrus |
|---|---|---|---|
| Stall geometry | Federal dimensions and slope limits apply | State overlay does not replace the geometry | Inspectors may compare the layout with site access |
| Pavement color | ADA guidance focuses on identification and layout | Blue outline and clear distinction are required | Color consistency and visibility may be reviewed |
| Sign wording | Accessible parking identification is required | “PARKING BY DISABLED PERMIT ONLY” applies | Sign condition and readability may be checked |
| Sign height | Accessible sign placement rules apply | Bottom at 84 inches above grade | Vertical height and mounting condition may be checked |
| Van designation | Van-accessible space must be identified | Van sign treatment may apply | Confirm the plaque and aisle match the layout |
The three-checklist method
Federal checklist: Confirm the stall width, aisle width, van configuration, slope, route, symbol, and required space count.
Florida checklist: Confirm blue marking, sign wording, mounting height, sign format, and the obligation to repaint when markings stop being clearly distinguishable.
Local checklist: Confirm the permit office or inspector's expectations for sign reflectivity, curb-cut alignment, drainage, and site-specific placement.
Federal ADA standards don't create one universal pavement color for every situation. Florida can be more specific. That distinction is why a property owner can paint mathematically correct geometry and still face rework after using a color or sign treatment that doesn't satisfy the state or local review.
Keep the sign hardware tight. Inspect set screws, post bases, and plaque attachments, then retap or replace damaged fasteners during the property's inspection cycle.
When a Property Owner Can DIY and When to Call a Pro
A two-person crew can handle a straightforward repaint in Dunnellon or Crystal River when the property has one accessible stall, a sound existing surface, direct curb access, and a layout that doesn't need to move. A rented airless striper, chalk reels, measuring tools, cones, and a suitable traffic paint can be enough for a controlled maintenance job.
The practical DIY boundary is narrow. It works best when the existing slope already meets the 1:48 requirement, the total line footage is under roughly 200 feet, and no van-accessible reconfiguration is needed. Those quantities are planning thresholds, not ADA rules, so the site still needs a proper measurement and slope check.
Owner-led work
| Factor | Owner Can DIY | Hire a Licensed Contractor |
|---|---|---|
| Layout | One simple, documented stall | Multiple spaces or a redesigned row |
| Surface | Sound pavement with compliant slope | Patching, drainage, or slope correction |
| Access | Clear curb and pedestrian route | Curb cuts, ramps, truncated domes, or obstructions |
| Equipment | Rented striper and basic layout tools | Professional striping equipment and marking controls |
| Risk | Low-complexity repaint | Compliance liability and inspection documentation |
| Sign work | Simple replacement where permitted | New post, wall attachment, or regulated installation |
The math changes when the lot needs more than four stalls, a curb cut or truncated dome installation, slope correction with patching compound, or a layout threaded around islands and light poles. At that point, the owner isn't just buying paint. They're managing access, geometry, curing, traffic control, sign mounting, and the possibility of removing work that fails inspection.
Florida licensing expectations also matter for sign mounting and related construction work. Ask a hired contractor for a scaled layout, measured dimensions, slope readings, product information, sign details, dated completion photographs, and a punch-list confirming that aisles and routes remain clear.
A professional evaluation is particularly useful for HOAs, churches, schools, medical facilities, shopping centers, and properties in The Villages where several parties may need documentation. Riverside Sealing & Striping, LLC handles concrete work, asphalt sealcoating, parking lot striping, accessible-space layouts, and related commercial maintenance across Central Florida. The company's licensed and insured status, reliable scheduling, and written site documentation should be verified as part of the owner's normal contractor review.
Maintenance Schedule to Keep Spaces Compliant Year-Round
Paint fades faster when Florida sun, rain, tire scrub, oil, and standing water work together. A property manager shouldn't wait until a symbol disappears or an aisle becomes difficult to distinguish before checking the lot.
Use a recurring inspection rhythm rather than a single repaint promise. Walk the spaces after heavy storms, after major pavement work, and whenever a tenant reports that an aisle or route is obstructed.
A practical inspection cycle
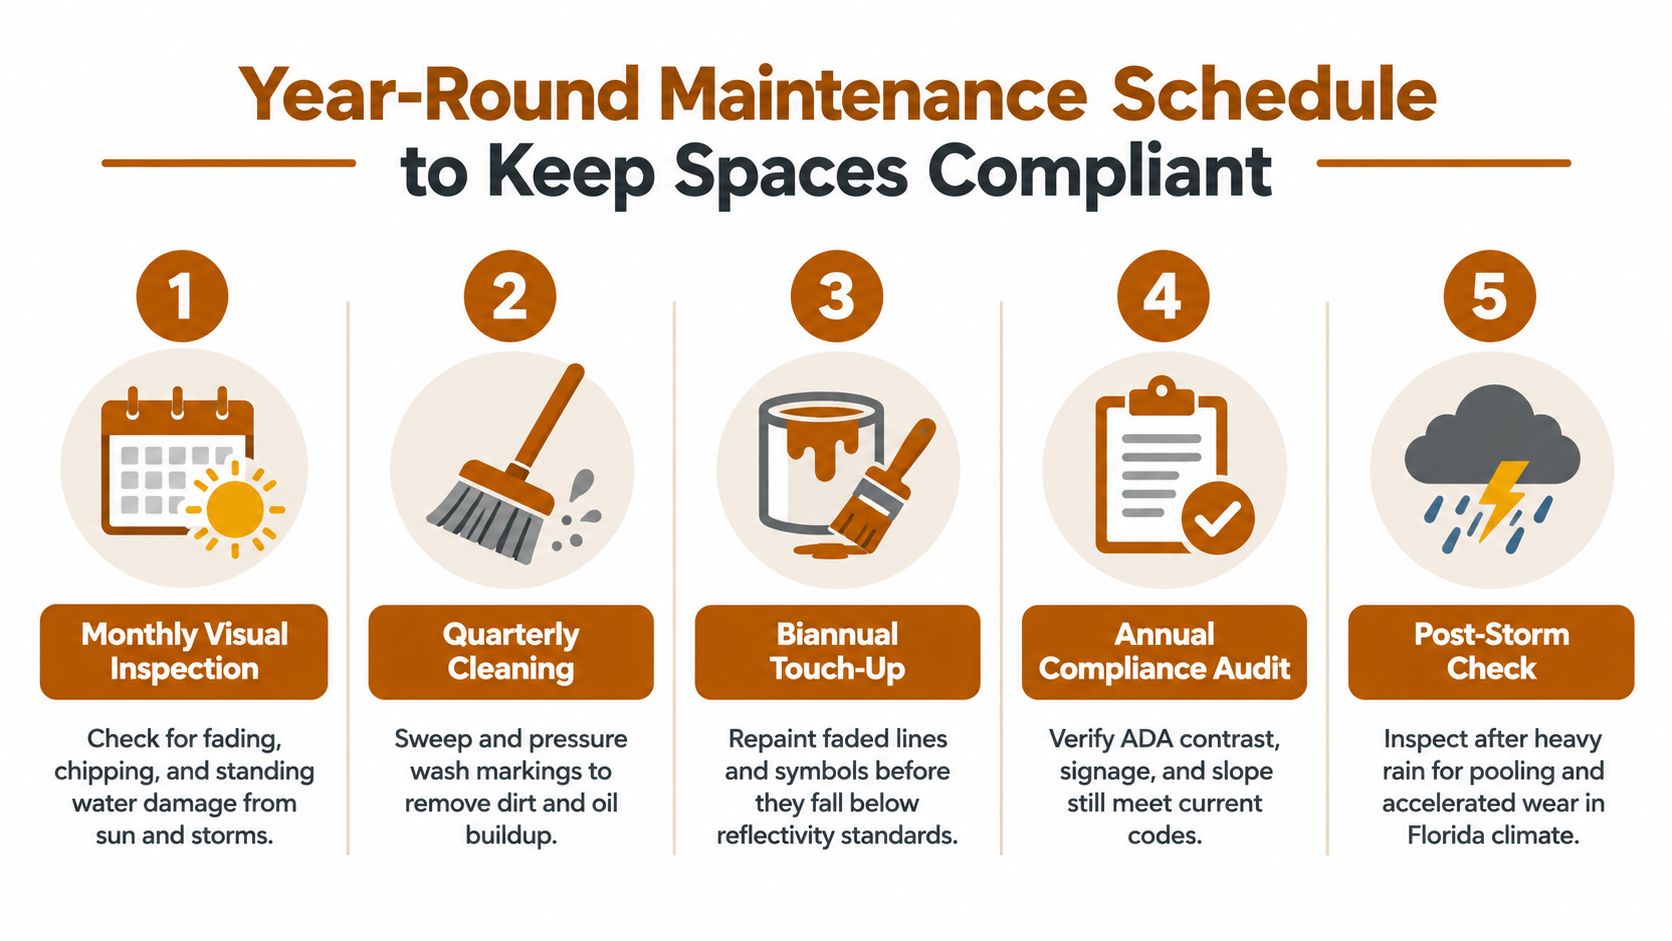
Monthly visual inspection: Look for fading, peeling, oil contamination, standing water, damaged wheel stops, and landscaping that blocks the sign or route.
Quarterly condition review: Sweep the space and aisle, remove dirt and loose aggregate, inspect stencil clarity, and check the sign face, post, bolts, and set screws.
Mid-summer review: Check again before the period of intense heat, storms, and high traffic exposure. Look closely at turning areas where tires scrub the hatch lines.
Post-storm inspection: Inspect pooling, washout, edge damage, and accelerated paint loss after heavy rain. Standing water can reveal a drainage issue that a dry-day visual inspection misses.
Annual compliance audit: Recheck stall and aisle dimensions if the lot has been resurfaced, restriped, reconfigured, or affected by construction. Confirm that the sign remains at the required height and that the route to the entrance is unobstructed.
Repaint before the marking fails
Trigger a restripe when white lines yellow, blue paint fades toward gray, or hatch lines become smooth from tire traffic. A symbol that remains technically visible to the crew may not be clear enough for drivers, visitors, or an inspector viewing it from the access route.
Clean markings before judging their condition. Oil and road film can make sound paint look faded, while pressure washing a weak marking can expose how much pigment has already disappeared. Use compatible cleaning methods and let the pavement dry before applying touch-up paint.
Keep a dated photo log for every inspection and repair. Photograph the stall, aisle, sign, route, and any corrective work from consistent angles. That record won't replace compliance, but it gives the owner a clear maintenance history if a complaint, tenant question, or audit arises.
Don't treat accessible parking as isolated pavement art. It is part of the property's broader maintenance plan, alongside concrete sidewalk repairs, asphalt sealcoating, drainage correction, and regular parking lot striping. A maintenance program protects appearance, supports safer circulation, and helps the owner address small defects before they become a full layout problem.
Riverside Sealing & Striping, LLC provides concrete and asphalt services, including accessible-space layout, parking lot striping, asphalt sealcoating, and related pavement maintenance in Marion County, FL and Citrus County, FL. Visit Riverside Sealing & Striping, LLC for a free, no-pressure on-site consultation and estimate for your property.